How to Setup Dual Monitors in Windows 10 Computer 2019
Many advanced users desire to have dual or even multiple monitors for their computers, especially for desktop computers. If you are a gamer, programmer or businessman, multiple monitors can help you with multi-tasking and overall functioning.

Dual monitors will surely improve the overall experience of watching multimedia content and make it more appealing and quite enjoyable. Once you go through the whole tutorial, then you will not find any difficulty to setup dual monitors on your Windows 10 computer anymore.
It should be noted that dual monitors could cause messing up your works no matter if you are a beginner or an expert. In case you permanently deleted important files while using dual monitors, remember to use a file recovery software to recover Windows 10 data as soon as possible.
Step 1. Connect the Dual Monitor to Windows 10
In order to setup the second monitor on your Windows 10 PC, you have to check the type of display port present in your PC/Notebook. Old desktop computers usually come with a VGA port. If you have a laptop with you, then you can find the port on the either side of it.
After locating the port, now you need a VGA Connector/ HDMI cable/ DVI cable or a Display port cable. Just in case your second monitor have different video ports, then you can use video cable converter like VGA to HDMI or Apple Display Adaptor if you have MacBook with you.
The display ports are usually attached to the graphic card of the Windows 10 PC. The graphics card usually comes with one or two video ports. If you wish to connect multiple monitors, then you can employ cable splitter for this task.
Step 2. Choose Display Mode on Windows 10
Windows 10 has already come with so many useful features which are proving themselves to be an asset. One of the listed features it offers is to hook up dual monitor. Once you connect the second monitor, you just have to optimize some settings which are quite easy to understand.
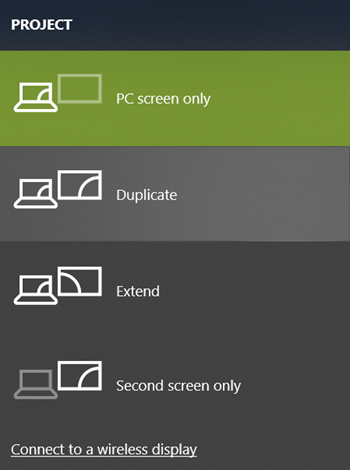
First of all, you have to decide that which type of display mode you want to see on your second screen. For this purpose, Windows 10 has already come with four type of display setting which can be accessed by pressing a keyboard shortcut: Win + P. Alternately, for some Windows 10 computers, you can also press Fn + F8 on the keyboard.

After pressing the shortcut key, you will find settings of Dual Monitor:
- PC Screen only: The second screen will be blackout.
- Duplicate: The second monitor will display the exact copy of First screen.
- Extend: The second monitor will extend the entire desktop of the main screen.
- Second screen only: Blackout will be on the main screen.
The best option is the one which provides same resolution on the both screens to avoid any type of content clipping. The Extend option will be an ideal one for this purpose.
Step 3. Change Display Settings of the Dual Monitor
After selecting the display mode in the dual monitor, the very next step is to change the display settings of the secondary display.

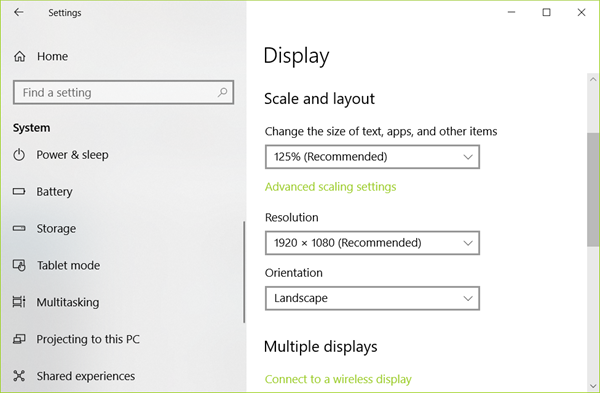
- Click Start menu, then go to Settings > System > Display.
- For the second screen, click on “2”. If you have more than 2 monitors, then click on “Identify” to find out which number is to be given to different monitors.
Now, all the changes which you make will automatically generate results on the second monitor.
1) Resolutions and Orientation Settings:
After you select the “2” option in the Windows display setting, you will see the Scale and layout option where you can change the size of text, apps and other items.
- Scroll down and you will find Resolution. The default resolution has been set up to a maximum level, but you can adjust it according to your requirements.
- Below Resolution, you will discover the option of Orientation, in which you can select the type of orientation, for example “Landscape” or “Portrait”.
- At the end of the page, you will find the option of switching display modes.
2) Brightness, Contrast and other color settings:
Basically, there are two methods for changing color settings on multiple screens. The first one includes the physical or touch buttons which can be used for changing brightness and other color settings according to your requirements. You will spot this option somewhere on the monitor shell.
Another method is through graphic card settings option, which requires a management app is supported for the graphic card. Just click on Control panel followed Choosing second display option. After this, you can change all the desired settings like Brightness, Resolution, Contrast and much more which you want.
Bottom Line
Hopefully you have already set up the second monitor or display under the guide. We recommend you to use the Windows 10 because it has so many features and gives easy access to them. You can select all the settings according to your needs and requirements. We hope that you will find the installing of multiple monitors quite useful. If you are using some other method, then please let us know in the comments section.

