How To Create Black and Dark Background Photos
You must have wondered how to create black background for photos. Most people think that it is possible only with the use of a black backdrop or black cloth. Yes, it is also the way to perform this task. But this is not the only and mostly used method. It is actually the proper use of exposure & lighting that works the best in this kind of photography. In this article, we have discussed everything about black background photography tips that you need to know. So just read this guide and master dark background photography.

PART 1. Method To Control the Light and Exposure
Before moving ahead, it is necessary to understand the concept of controlling light & exposure. If you think that you will be able to get satisfying results with your light and camera set at the auto settings, you are actually wrong. There will be a need for you to have good control over the light & exposure.
The face of your subject should be well exposed and there should be a proper balance between the light falling on the subject and the background. This kind of balance will help you to put a black background on a picture without using a backdrop.
In case your subject is light-skinned, it will be easily separated from the black background. On the other hand, you will need to use a backlight to be able to separate it from the black background, if the subject is dark-skinned.
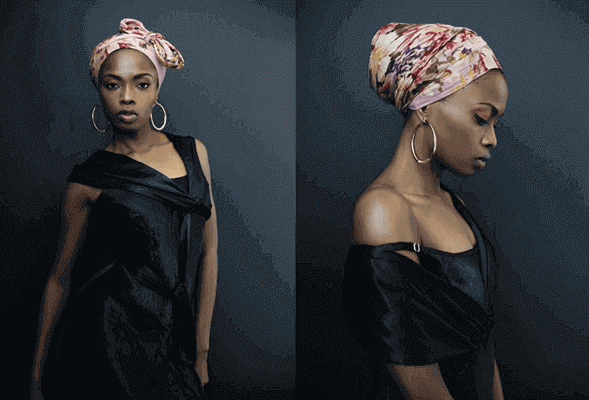
In order to end up having a proper dark background in your portrait, you can perform the following actions:
- You can increase the output of light coming from the flash.
- You can also try decreasing the gap of distance between the light and your subject by moving them closer.
- Another thing that you can do is to move your background away from your source of light.
Lighting Tricks for Black Background Photography
Below we have mentioned two important lighting-related tricks that you can use while shooting in order to create black background for photo:
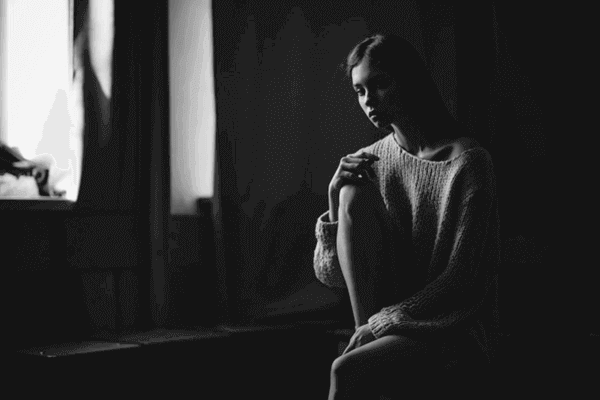
- You can make use of natural light also. For example, you can easily create black background for photo by positioning your subject near the window of the room, keeping all other windows and doors shut.
- And, you can also make use of artificial lighting for creating black backgrounds. This kind of lighting provides better control as compared to natural lighting. That’s because you can also use flags in this trick. The flags help you in stopping the light from coming from the unwanted areas.
Create Black Background for Photos With Natural Light
In case you intend to use natural light in a room for portrait photography with a black background, you will have to make the following set up:
- Place your subject next to an open window or door
- No electric light should be kept turned on.
- Other windows and doors must be kept closed.
- Adjust the angle of the camera in such a way that no area with light should be seen in the background.
- Although it is not necessary, yet if you can, use a backdrop of black color.
- In case you are making use of a backdrop, it should be set up in such a way that its edges may not be seen in the frame.
- Try to keep the black backdrop as far back as possible from the subject.
- There will also be a need to advance the background nearer to the subject.
Create Black Background for Photos With Electric or Artificial Light
Just like natural light set up, in case of electric light also, you will have to keep in mind that the amount of light falling on the subject must be more than the light falling on the background. When you are using the sources of electric light (like a flash, studio strobes, etc), you have better control as compared to the natural light set up.
Here you will have to keep in mind the following points while making the set up for shooting the photos with black background:
- As far as possible, perform your photo shooting in a small room.
- There should be a proper separation between the background and your subject. In this way, you will be able to let more amount of light fall on to your subject as compared to the light falling on to the background.
- There will be a need for using “flags” in case you are shooting in a room.
- Flags will make it possible for you to prevent the light that you are putting on the subject from causing any effect on the background.
- In order to prevent the light from spilling, you can make use of modifiers on the light source you are using.
- You can make use of barn door attachments with the purpose of controlling the light.
- In many cases of portrait photography, a soft-box or umbrella is used. That’s because it helps in scattering the light, making it softer.
- If you attach a snoot to your flash, it will make the light more directional.
- The light source and your subject should also be kept at a gap of enough distance.
PART 2. Create Black Background Photos Without Control of Light
Is it possible to create black background photos without control of light? The answer is yes. In your routine life, there are times when you find people in a situation in which they have a natural dark or black background behind them. In such a case, you don’t need to make any artificial set up in order to create a black background or dark atmosphere.
Another way to make it possible is to create an illusion of a black backdrop by playing with various settings available in your camera. We have explained this method below in detail.
Make Use of Black Backdrop in Black Background Photography
Although it is not mandatory, yet using a black backdrop is an obvious and most useful method to create black background for photo. And, if you make use of a black backdrop in your photography, you will need to spend very less time in editing the photo. On the other hand, if you don’t want to use any black backdrop in photography, you can manage to get the best results with the use of proper lighting that we mentioned before.
And, when it comes to the options that you can use as a black backdrop, there are many options that can be used. Some of the most popular options are black fabric, black velvet, black bed sheet, etc.
Make Settings in Camera for a Black Backdrop
Do you know that, for the photography with a black background, you can create a virtual black backdrop by doing some settings in your camera? Yes, it is also possible. But you will have to be having sound knowledge of using your camera in order to gain the best output. You can follow the steps given below to photograph with black background:
- Step 1: First, decrease the ISO level of your camera so as to reach the lowest level that is available. By doing this, you will be able to decrease the sensitivity of your camera to the light.
- Step 2: The next step is to set the speed of your shutter as high as possible. It will ensure that the amount of light reaching the sensor will be the least. And, the aperture of the camera should be set around f/5.6.
- Step 3: Now you should ensure that there is only a dark or black background visible on the screen. If this is the case, you can proceed with Step 4. Otherwise, proceed with Step 5.
- Step 4: In case the backdrop that has been created virtually by the camera is not as dark as you want or as expected, there is a solution. You can do this by increasing your camera’s aperture. Increase it to f/8.0.
- Step 5: Now you have to make use of the flash so that your subject can be brought in from the image of a plain background.
Some Useful Tips To Be Perfect In Creating A Black Background For Photos
Here below we have listed some of the most important tips that will help you to master the art of performing black background photography:
- Always keep your object ready for shooting so that whenever and wherever you find the right background that can help you create the black background photos, you can just take advantage of the opportunity without missing it for any reason.
- As you know that it is very easy to find the shadows of plants, buildings, etc. on a sunny day. Once you are able to find such shadows, figure out the intersection of shadow and sun. That intersection between them provides a very shiny and black background that you can use for shooting your photos with a black background.
- For the best results, it is good to place or position your subject right at the intersection line of the shadow and the sun.
- As you very well understand that flash is a very important feature or part of your camera settings when it comes to photography with the black background. Flash is used to improve your creativity while shooting with dark backgrounds. Moreover, it is the flash that helps in creating bright areas or spots in your pictures. Hence it is highly recommended to get a good hold on the flash feature and master in experimenting with it so that you can easily get most out of your photography projects.
- In order to do practice the art of capturing dark or black background photos in an indoor environment, make use of a black bed sheet. You can make use of it for backdrop photography as well.
- By putting the black poster or bed sheet on the wall, it becomes very easy for you to practice photography with a black background.
- Use the trick of squinting the eyes in order to observe the dark background more precisely. Squinting helps a lot in seeing the real view. That’s because it puts a limit on the light that comes into your eyes. Moreover, try to look as closely as possible.
PART 3. Post-process the Photos With Black Background after Shooting
There are times when there is not much difference in the value of light on the subject and that on the background. In such cases, you will need to edit your photo using some photo editing software in order to make your background darker. Of course, there are also some tools that can help you brighten dark photos too.
And, you can make use of the software like Photoshop and Lightroom for this purpose. The tools that are generally used in manipulating the background in Photoshop & Lightroom are Blacks, Shadows, Brush, Burn, Contrast, etc.
Here we take Lightroom as an example, and you can follow the steps given below:
If the Background is Uniformly Black
- Step 1: First, determine how much the background in your photo needs to be darker.
- Step 2: Then make use of the sliders of Shadows and Blacks in order to make adjustment in such a way that it may look just as you want.
If the Background is not Uniformly Black
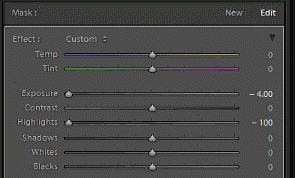
- Step 1: First, you will need to darken the background areas. In other words, you will need to paint the areas that have too much brightness in the picture. Here you will have to make use of the Brush tool available in Lightroom.
- Step 2: Then you have to move the slider of Exposure to the right or left in order to make the best adjustment.
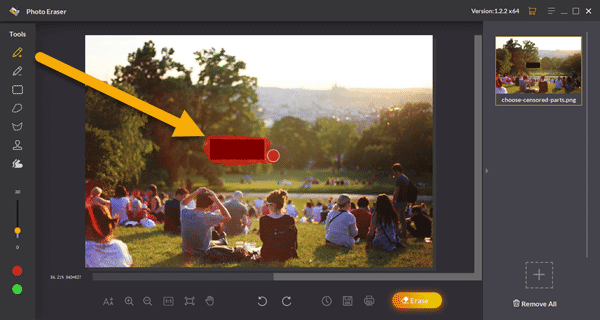
For some small areas that are not uniformly black, you can use Photo Eraser software to paint them and make them as black as other areas. As its name suggests, it is an effective tool to erase unwanted objects from photos by filling the selected area with intelligently-generated textures pulled from the surrounding pixels. Hence, it can also be used to remove censored parts, watermarks, tourists, street signs, power lines, and other undesirable objects from pictures without spoiling the image background.
Final Words
As mentioned above, it is mandatory to have more amount of light on the subject than the background in order to gain the best results in black or dark background photography. Hence it is an art that demands a very close observation of light while shooting photos. The more you are master in observing or seeing closely the light, the better the results will be. And still, if the results are not that satisfactory, the post-processing of the dark background photos with the use of editing software like Photoshop & Lightroom does the rest.

