The Master Guide to iCloud Photos: Something You Need to Know in 2019
iCloud is undoubtedly one of the best cloud storage space where iOS users can upload their iPhone photos absolutely for free, just as Google Drive does for Android users. But if we compare the features and security offered by Google and Apple, then you will find iCloud is much better than Google Drive.
When you first sign in to the iCloud, you will automatically get 5GB of free storage space. You can use the free space to store their photos and videos. You just need a stable internet connection to upload and access the photos directly from the iCloud anywhere and anytime you want to. The Apple ID you are using in your iPhone/iPad can be used to login on various platforms to access the iCloud data. In this article, we will provide you all the relevant information about using and managing iCloud photos.

Bonus Tips: Are you upset about deleting or losing some precious photos in iPhone accidentally? Jihosoft iPhone Data Recovery will help you recover the permanently deleted photos.
Contents:
How to Enable Or Disable iCloud Photos
If you want to use iCloud services, then you are just one step away from using it on your iPhone/iPad. Users are supposed to enable the iCloud services in their iOS devices. This is not a tough work, you can do it as the steps below.
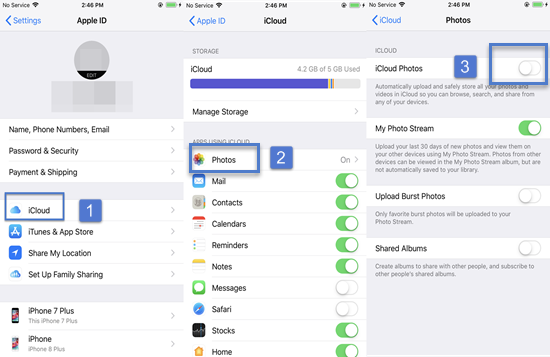
Option 1: How to enable iCloud Photos on iPhone & iPad
- Open the Settings app on your iPhone and enter the Apple ID menu
- Go to iCloud > Photos
- Switch on/off the toggle of iCloud Photos
Option 2: How to turn on iCloud Photos on Mac
- Open the Photos app and click the Photos option.
- Navigate to Preferences…
- Check in the small box before the iCloud Photos.
- Select Optimize Mac Storage or Download Originals to this Mac as you like.
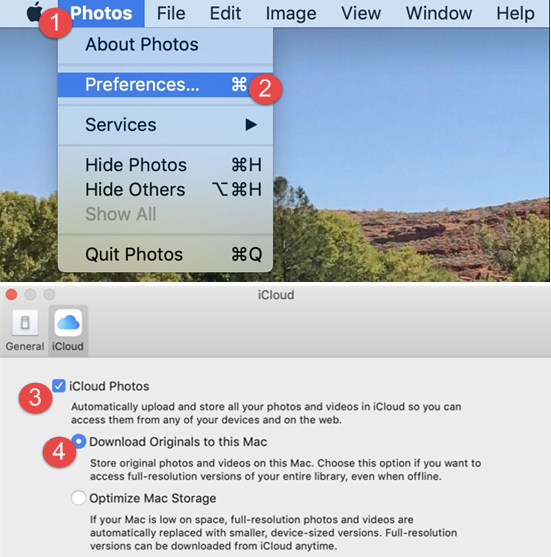
You are allowed to disable iCloud Photos on a single Apple device. On iPhone/iPad, just follow the same steps with enabling. On Mac devices with iOS OX 10.10.3 later version, go to System Preferences > iCloud > Photos, and then toggle iCloud Photos off.
How to Upload Photos to iCloud
As long as you turn on the iCloud Photos on your iOS devices, any new photos will be added to the iCloud Photos linked with your Apple ID automatically. You can also manage the uploading manually.
On Mac, you can drag and drop the photos you want into the Photo library on Mac to upload them to iCloud Photos.
Moreover, you can also upload photos to iCloud Photos on iCloud.com. Sign in iCloud.com with your Apple ID and passcode and select Photos. Navigate to the icon shaping of a cloud with an up arrow and select the photos you want to upload.
How to Access iCloud Photos
Option 1: Access iCloud photos on Apple devices
When you turn on the iCloud services, all the photos from your iPhone or iPad will automatically get backed up on iCloud. And if you want to access these photos on another Apple device, then you can access all these photos just by signing with your official Apple ID related to your iCloud Photos. This feature of accessing all the photos using the photo app is available for all iPhone/iPad or Mac users.
Option 2: Access iCloud photos on PC
If you own an iPhone but don’t own MacBook, then you can also access all the iCloud photos directly on your PC just by downloading the iCloud for Windows app on your PC which is installed with Windows 7 or later versions. Just download this app and login with your Apple ID which is linked with your iPhone or iPad. Or you can go to iCloud.com.
Option 3: Access iCloud Photos on Android devices
If you want to access the iCloud photos in any of the Android devices, then you also do this task easily. You are just supposed to open the iCloud.com website on your Android device. After the site gets loaded once, click on the option of “Desktop site” and fill your Apple ID credentials to access all the iCloud photos which are linked to that Apple ID. Using this method will only give you limited access to limited media files.
How to Download Photos from the iCloud
If you want to download some of the photos to your PC from iCloud, then you can follow the following steps.
- Sign in iCloud.com with your Apple ID and passcode and click the Photos
- Choose the photos you want to download and click the icon shaping of a cloud with a down arrow.
- Save the photos to your PC.
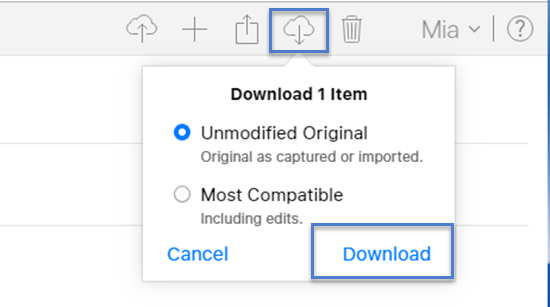
Please notes that there will be two options unfolded when clicking the downloading icon: “Unmodified Original” and “Most Compatible”. The unmodified original option will download the pictures in the same resolution and the Most Compatible option will download photos in edited form.
How to Use iCloud Photo Sharing
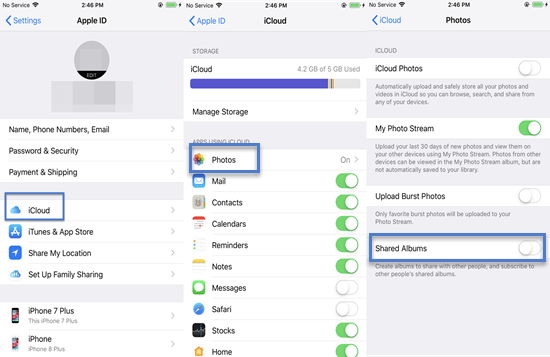
If the iOS version of your iPhone is an older one, you can find a standalone option of iCloud Photo Sharing.
For the latest iOS 12, its name has been changed to Shared Album. On the iPhone, you can find it by going to Settings > iCloud > Photos. If you switch its toggle on, your iPhone will create albums to share with others and also subscribe to others’ shared albums.
How to Delete Photos from iCloud
Deleting photos from iCloud is not a big deal as long as you have some basic knowledge about the working of iCloud.
- Log in iCloud.com with Apple ID and password and select Photos
- Select the photos you want to delete.
- Click the Delete icon on the top right corner.
If you aren’t been able to delete iCloud photos, then you should check if this feature has been enabled on your devices.
Bonus Tips: You can press on Command on Mac or Ctrl on PC and select several discrete photos one by one. And you can hold on the mouse of Mac or press the Shift on PC to select consecutive photos.
How to Retrieve Deleted iCloud Photos
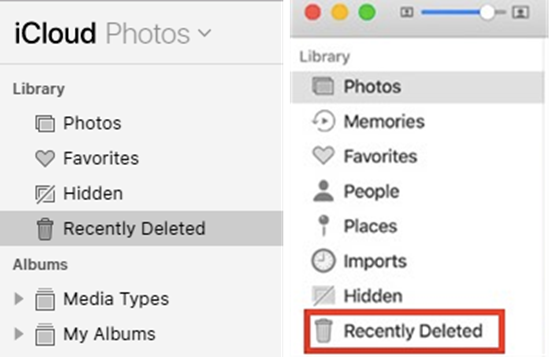
If you have accidentally deleted some of the photos that you don’t mean to delete, then you have the option to recover those photos easily. Basically, all the photos which you have deleted, either on Mac or iCloud.com, will be moved to a bin named Recently Deleted under the Photos menu. Deleted photos will stay there for 30 Days on Mac or 40 days for iCloud.com. In this time period, you can retrieve the photos from the Recently Deleted folder anytime you want.
How to Fix iCloud Photos Not Syncing
There are mainly two reasons why iCloud photos not syncing: One is that iCloud of photo syncing is disabled, and the other is that you get an unstable internet connection.
First of all, you have to check that the iCloud icon is enabled or not in the settings menu of your iOS device. If not, then enable the toggle of iCloud services which will sync all the iCloud photos on your devices hassle-free. The other possible reason for this issue of not proper synchronization is that your iOS device is not with the stable internet connection which is creating real troubles for the syncing process.
If the iCloud photos are not syncing on your MacBook, then you can restart the iCloud app in your MacBook so that it can easily start the syncing process again. There are some instances when due to some technical glitch, the iCloud server might not become able to sync all the iCloud photos. So, restarting the iCloud app will definitely troubleshoot this issue.
How to Reduce Cellular Data Consumption of iCloud Photos
If the iCloud photos are consuming a lot of cellular data on your iPhone, then there may be a possibility that you have enabled “Unlimited updates” option under the Photos menu of the settings app. Basically, when this option is enabled, your iPhone will use the cellular data to upload the iCloud Photos every time. So, disabling this option will let the users to manually upload the photos when they have a stable internet connection. It will surely help you to restrict internet data consumption up to some extent.
Fix iCloud Photos not Compatible with APFS Formatted Volume
Majority of the Mac OS users have reported the issue of APFS volume error when they upgrade to the latest released Mac OS Mojave version. This error is telling the users that the iCloud photos are not compatible with the AFPS formatted versions. Actually, when you have turned on AFPS encryption, there may be some chances that the iCloud Photos will show this error to you. So, the only method to fix this issue by restarting the MacBook. Restarting the MacBook will surely end every glitch which is creating troubles and errors in the functioning of iCloud.
What to do When the iCloud is Running Out of Storage
The best way to deal with the storage shortage is to free up it and reduce the use. On the one hand, you can purchase the extra space through the Apple website by paying some charges. You are allowed to choose up to a maximum of 2 TB of storage space. The base charge of a minimum 50GB of extra storage space will cost you around 99 cents. So, definitely, a very good call if you purchase some extra storage space in your Apple ID.
On the other hand, you can delete some media files that are not so important from iCloud. If you still want them, download them to your computer. Shut down the iCloud backup function of some apps like Photo Library, the backup data will be deleted from iCloud. You can also disable and delete content from iCloud Photos by following steps.
- Enter your Apple ID page and tap on iCloud
- Click Manage Storage option, then Photos
- Select Disable & Delete option
This operation will disable iCloud Photos and delete all the photos and videos stored in iCloud. And you have 30 days to download them.
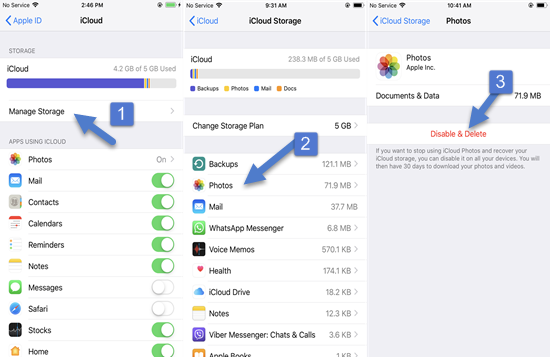
On Mac, you need to go to Apple menu, click System Preferences and then iCloud. Choose Manage, iCloud Photos, Disable and Delete in sequence.
Conclusion
This article details some information about iCloud Photos. iCloud Photos is a useful platform for iOS users to store photos and videos and it is not a tough work to use it. We really hope this informative article will help you learn more about the iCloud and how to utilize it better. If you have any other query or complements, please leave them on our comment section.

