How to Take a Screenshot on Samsung Phone and Tablet
Taking a screenshot while using a mobile can be a necessity or sometimes you might tend to do it just for fun. While the latest Android phones, especially the latest 5G Android smartphones, have made it easy for you to screenshot Android phone, it is still a mystery for some of the users. Samsung is a renowned brand in the market of smartphones and is known for providing extraordinarily featured Android phones and tablets. As we have also included a guide to help you know how to capture a screenshot on Android mobile, so today, we will focus on how to take a screenshot on Samsung S8/S9/S10 and other Samsung devices.
Method 1. How to Screenshot on Samsung by “Palm Swipe to Capture”
This “Palm Swipe to Capture” feature works only on certain Samsung Galaxy series mobile phones. And if you want to get it to work on your device, you will have to enable this feature first by doing so:
- Step 1: On Samsung phone, go to Settings > Advanced features. However, on some older Samsung phones, it will be Settings > Motions and gestures.
- Step 2: Find the Palm swipe to capture box, and tick it.
- Step 3: Close the menu and go the screen you need to capture.
Afterwards, it is super easy for you to screenshot Samsung Galaxy phones with the Palm Swipe feature by following these steps:
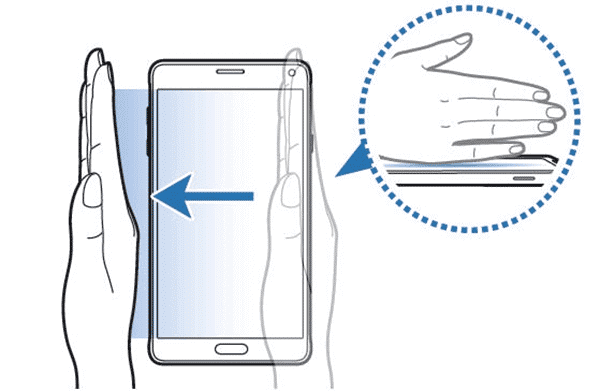
- Step 1: Place your hand in a vertical position on either side of your mobile’s display. The position should be such that it resembles the way a karate expert places his palm on a platform of bricks before smashing it to pieces.
- Step 2: Now, you just have to slide your palm towards the other end of your screen in a horizontal way.
- Step 3: After doing that successfully, you will hear the camera make a shuttering sound and the screenshot will be automatically taken by your device.
Your Samsung device will then save the screenshot on the Samsung phone gallery and a notification will be sent to you. If you cannot find that screenshot on your phone, then it is likely that it was deleted by wrong deletion or other wrong operation. So in such situation, you need an Android Phone Recovery tool to recover deleted photos from Samsung Galaxy phone without backup.
Note: This technique is very easy but it may take a few attempts before mastering it. And as we mentioned before, this method works only for the Samsung Galaxy phones that were launched after 2013, for example, the Samsung Galaxy S10, Galaxy S9, Galaxy S9 Plus, Galaxy S8, Galaxy Note 10, Galaxy Note 9, Galaxy Note 8 and etc.
Method 2. Take a Screenshot on Samsung by Using the Power and Home Button
If you are not accustomed to taking a screenshot on Samsung mobile or tablet with Palm Swipe, then you can use this common-used method which works with most of the Samsung phones and other brands of mobiles as well. However, there is a little difference in capturing screenshot on Samsung phone with a physical Home button and Samsung phone without a Home button.
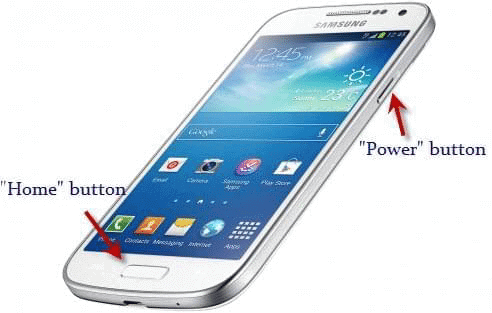
For those Samsung phones and tablets that have a Home button, for instance the Galaxy S7, Galaxy S6, Galaxy Note 5 and so forth, please follow these steps carefully:
- Step 1: Locate the Power button and the Home button on your Samsung device. The Home button is usually located just below the display of your device and the Power button will be usually located on your right.
- Step 2: After locating these buttons, you just have to press both these buttons together. If you succeed in doing so, the camera will make a shuttering sound and your device will capture a screenshot.
- Step 3: A good technique to get this method working is to hold the power button a couple of seconds before pressing the home button so that you can press both of them at once conveniently.
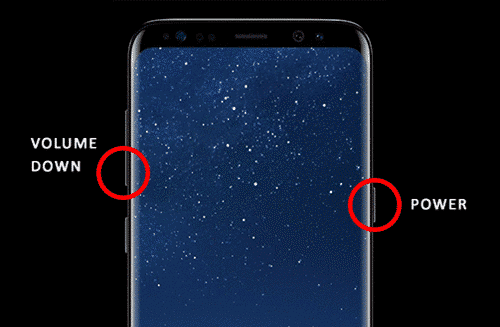
For those latest Samsung Galaxy phones, such as Galaxy S9 (Plus), Galaxy S8 (Plus), Note 8, etc, that do not have a home button due to the full bezel design of their displays, then you can follow these steps:
- Step 1: Locate the Power button and Volume Down buttons of your phone or tablet.
- Step 2: Press and hold these two buttons simultaneously for a second or so and then you will hear a shuttering sound and the device will automatically screenshot on Samsung phone for you.
- Step 3: You will get a notification saying that the device has saved a screenshot in the gallery. You may find this screenshot either in a separate folder named as “Screenshots” or in the “Camera photos” folder of your device.
Method 3. Capturing a Screenshot Using Samsung S Pen
If you own a Samsung Galaxy Note series and other Samsung phones that works with a Stylus Pen which is usually referred to as an S pen, then you can use this method. Follow these steps to learn S pen screenshot Samsung Galaxy Note device method:
- Step 1: To use the S Pen, you need to launch the “Air Command” menu on your display first. For that, you just need to pull out the pen from the phone, or hover the S pen over the screen and click the button on it.
- Step 2: After that, in the ‘Air Command’ menu, you will find several features that you can access with the help of the S pen. Please select “Screen Write” from those alternatives. This command not only enables you to screenshot on Samsung but also enables you to write some notes on the captured image or draw something before saving the screenshot.
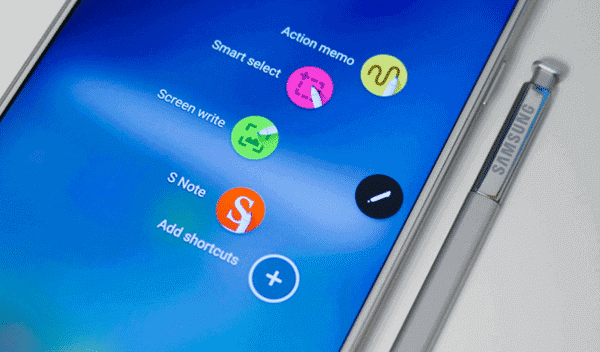
- Step 3: You can also change the color or size of the S pen if you want to show your creative skills. You may also crop the desired part of the photo or if something gets messed up you can erase or undo it as well.
- Step 4: Once everything is completed, you can share the image or press on the ‘Save’ button located at the bottom of the menu. It will save the screenshot in your device’s gallery.
Final Words:
These are the methods that can help you learn about how to take a screenshot on Samsung tablet or phone. You can choose the suitable method to make screenshot according your Samsung device. If you know about some other techniques or methods, or have any doubts or confusion, please let us know and connect with us.

