How to Change Public and Private IP Address on Windows 10/7/8
IP (Internet Protocol) Address is the unique numerical label allotted to each device which uses the internet and connected to computer network. It is a term, a usual internet user would not even think about, but it is an important technology which mainly serves two foremost functions of network interface identification and location addressing.

Why to Change IP Address
There are several reasons why one would want to change IP Address, such as when you’re banned by IP based sites, or when you want to register more than one account on a particular site. The other perk of changing IP address is that you can change or hide your identity and can get access to all the IP based restricted data.
There are mainly two IP types, Public IP and Private IP. Public IP is an address assigned by the Internet Service Provider (ISP) to identify that network which you can find by searching what’s my public IP on Google too. It is unique globally. Whereas Private IP is an address within this macro network web, allotted to a particular device on that network.
It is fun and safe under some circumstances to change the IP address of your Windows computer, but you should still be cautious of online virus, which could cause loss of money and important files.
There are a few free antivirus tools for Windows computer. However, in case accidents happened and you have lost precious photos or documents, do remember to try a data recovery software to retrieve files lost due virus.
Part 1. How to Change Public IP Address on Windows 10/8/7
As mentioned above, the Public IP is an address which is given by the service provider, who mostly assign dynamic IP Address and changes from time to time. Therefore, we can change public IP address easily by given ways.
- By unplugging your WiFi Router and modem.
- By disconnecting computer’s WiFi connection
- By contacting ISP. Sometimes the ISP provides a static IP, in which case it can be changed by its technical support. Mostly it can be changed for once.
- By using Proxy Network: Using a Proxy or VPN service will display a different IP Address. It will be provided by VPN service provider. You may need to pay for the service.
Part 2. How to Change Private IP on Windows 10/8/7
As a matter of fact, most people are looking for this part. However, firstly, you should know:
How to Find/Refresh/Renew IP Address in Windows
- Step 1. Press Windows + X keys together and open Windows PowerShell (or Command Prompt).
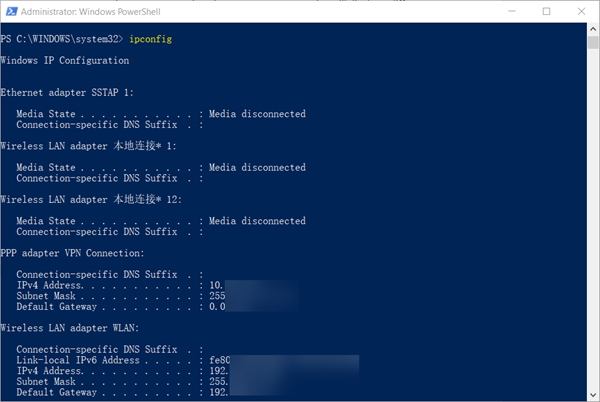
- Step 2. Type ipconfig and hit Enter, then the information will be displayed in the window.

- Step 3. Type ipconfig/release and ipconfig/renew to refresh or renew IP Address.
How to Manually Change IP Address in Windows
Now if you want to set or change static IP manually. The step by step guidance is given below.
Note: the instruction is based on Windows 10, but the operation should be similar on earlier version Windows OS.
- Step 1. Click Start menu, then type Control Panel and click the option on the result.
- Step 2. Open Network and Internet > Network and Sharing Center.
- Step 3. On the left pane of the new window, click Change adapter settings.
- Step 4. You will be displayed with Network Connections of the PC.
Important note: Right click on “Ethernet” or “Local Area Connection” if you want to change IP of any physical connection. And right click on “WLAN” in case you wish to change IP of any wireless connections. - Step 5. Choose Properties after right clicking on the network name.
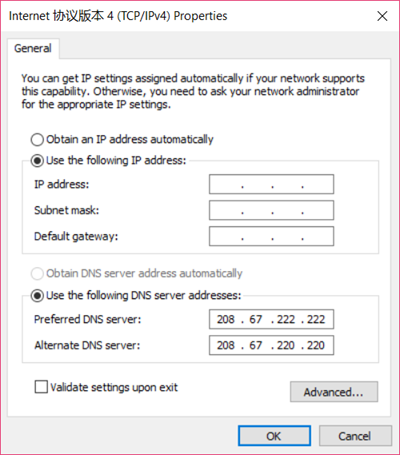
- Step 6. Select the Internet Protocol Version 4 (TCP/IPv4), then click Properties.
- Step 7. Obtain an IP Address automatically should be selected by default, but please choose the Use the Following IP Address.
- Step 8. Now put your desired IP Address according to your wish its correct format. Change Subnet mask and default gateway if you want to.

- Step 9. Check the box Validate settings upon exit and click OK to save the settings.
If you are using more than one network on your PC, enter the details like subnet mask, default gateway, preferred DNS server, and alternate DNS server.
If you wish to reverse the operation, then minimize the “Network Connections” window, then repeat the steps above, but in step 8, choose “Obtain an IP address automatically” to access the Internet again.
We know that changing an IP Address is an unpleasant and prolonged experience, but if you know how it can help you to access some restricted data and some IP based ban sites, you would definitely find this above article helpful. Give your valuable feedback in the comment section and still, you have some queries or need feel free approach.

