How to Set a Voice Recording as a Ringtone on iPhone Xs/X/8/7/6s
iPhones, by default, have some really cool tones that can be used as ringtones. But here is the thing: People usually prefer songs to the default ringtones. However, many people don’t know how to set a downloaded song, or a voice memo they recorded, as a ringtone on their iPhone.
In this article, we will tell you how to convert a voice memo in a ringtone on iPhone with or without Computer. You can use this feature to record voices of different people and set them as default ringtones for those people. Thus, you can know who’s calling without even looking at the phone. You could also set a famous speech as your ringtone to motivate you always. Either ways, there are many practical uses of this, and below we are going to show you how to do it.
Tips: If you want to recover deleted voice memo from iPhone, you can always use Jihosoft iPhone Data Recovery to get them back easily.
How to Turn a Voice Memo into Ringtone on iPhone via PC
Step 1. Record the Voice with Voice Memos App
First, you need to record the voice that will be set as ringtone. To do this, you don’t need to download any special app. All iPhones have a very useful Voice Memos app built in for voice recording. Just open the app and click on the red record button. Once the audio has been recorded, stop the recording by tapping the same red button and save it on your device.
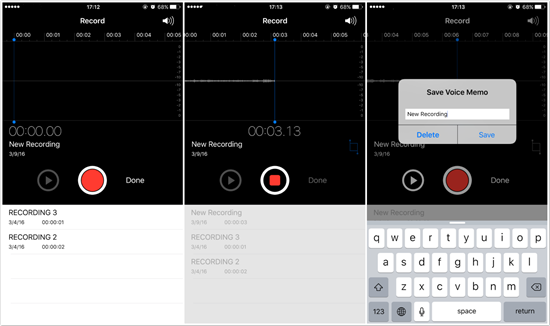
Before moving to the next step, you should verify if the recording is good enough to be used as a ringtone. If the recording is good, you can move to the next step.
Step 2. Share the Voice Memo to Your PC
After the audio has been recorded and saved, it needs to be sent to a PC for further processing.
Simply click on the recording you just created and then click on the share button. From the options presented, select the mail option and mail it to yourself so that it can be downloaded on your PC. You can also share it using other file transfer apps like SHAREit. Or you could simply upload it to a cloud service like iCloud Drive or Dropbox so that you can download it later on your PC from the cloud storage service.
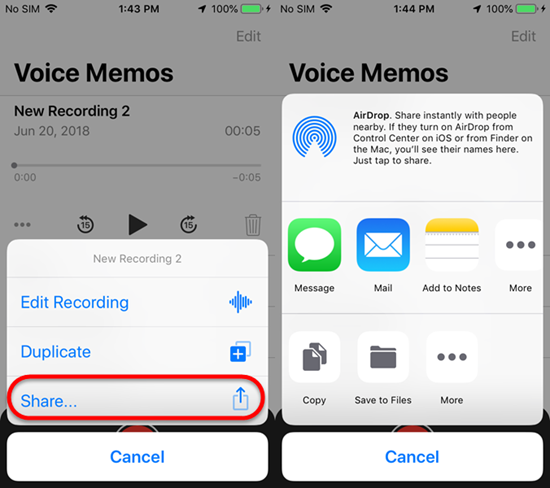
If you are using a Mac, then you can also simply Airdrop it to your Mac. No need to mail or upload to the cloud.
Step 3. Change the Voice Recording into a Ringtone
To change the voice recording into a ringtone, you need to use your Windows PC or Mac.
- First find the audio file you shared from your iPhone to your PC.
- The recording will be saved as a file with a “.m4a” extension. To enable it to be used as a ringtone, you need to change the extension to “.m4r”. To do this, simple right click on the file and rename. Then change the extension and save.
- After that you need to open the file in iTunes on your PC or Mac. iTunes is installed by default on a Mac. If you don’t have iTunes on PC, head over to Apple.com and install it today.
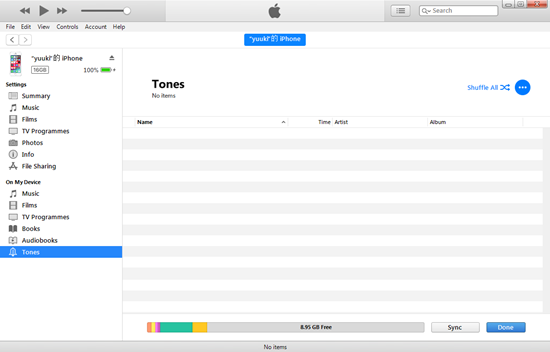
- Once the file has been imported into iTunes (you can just drag and drop), we need to change the length of the audio file. Any ringtone for iPhone can’t be longer than 30 second. So you need to right click on the file in iTunes, click on “Get Infor” to change its length. You can play it on iTunes to find the perfect start and end time point.
Afterwards, synchronize your iPhone with iTunes to copy the ringotne. Simply connect the iPhone to your PC or Mac and click “Sync” if you use the older version of iTunes; or click on the “Tone” section and drag-drop the file if your iTunes is latest. The sync process will copy the ringtone to the iPhone and it will now show up in the ringtone list.
Step 4. Set the Voice Recording as a Ringtone for iPhone
Now, just head over to Settings > Sounds -> Ringtones in your iPhone. You should be able to see the voice recording available as a ringtone option. Just select it to set it as the default ringtone.
You can test it by asking anyone to call you. You ringtone will work as expected.
Set Voice Memo as iPhone Ringtone without Computer – Using GarageBand
Apart from the process mentioned above, you can also directly set a voice memo as a ringtone on your iPhone itself. It’s a slightly complicated method when compared to the iTunes method, but if you follow the steps below properly you should be fine.
Before starting the steps, make sure that the audio is recorded in the voice memo app of the iPhone and the GarageBand app is also installed.
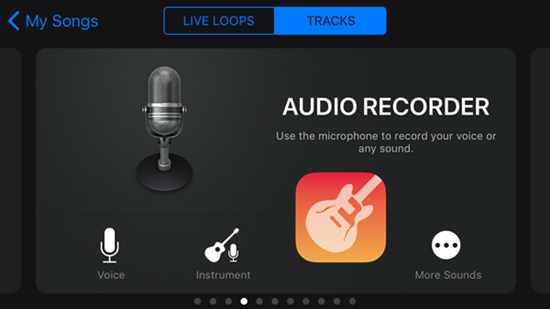
- Step 1: Open the Garageband app on your iPhone. You will see an audio icon in the main interface. Click on it.
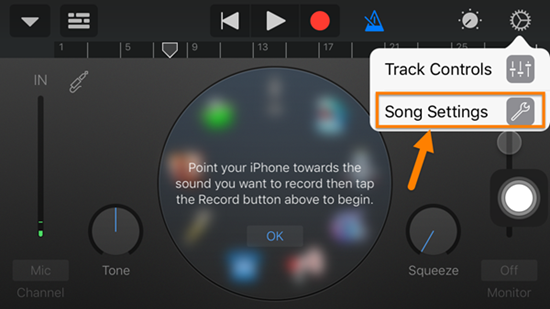
- Step 2: In the next screen, you will wind a gear icon on the top right. Click on it and then click the song settings option from the pop-up menu.
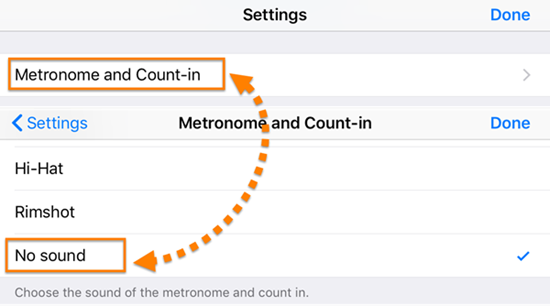
- Step 3: In the settings page, select the “METRONOME and COUNT-In” and then “No Sound”. Once selected, click done. You will be back to the starting page with the gear icon.
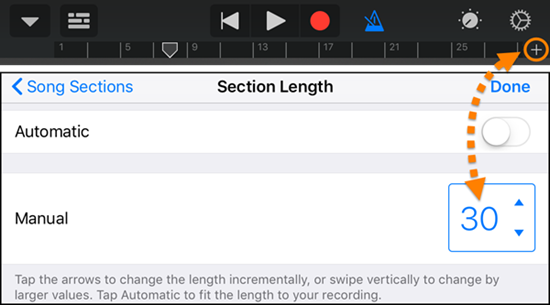
- Step 4: Below the gear icon, there is a + sign. Click on it. It will take you to the settings page for Section Length. Ensure Automatic is turned off. Increase the number against manual to 30. Then click Done to go back to the main page.
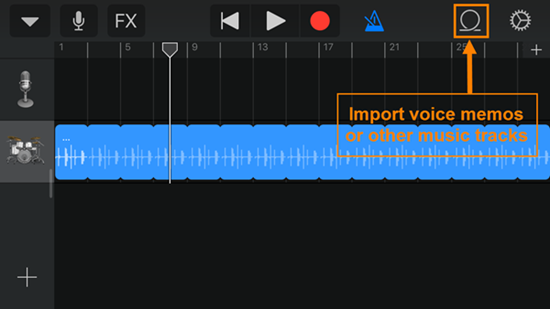
- Step 5: To the left of the gear icon, you fill find a loop icon. Click on it. This will allow you to import the voice memo you recorded, or any other stored music file into the main page. Just long press on the voice memo from the list and then drag it to the timeline on the main page.
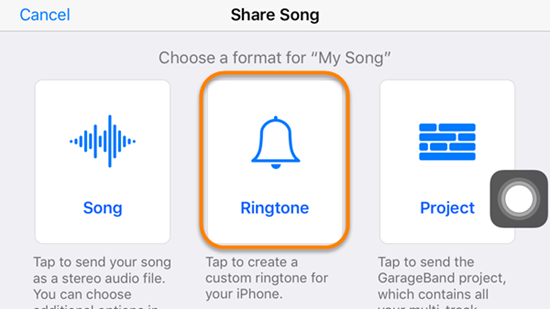
- Step 5: Now, Save and share the song as a ringtone. You can name it anything you like while saving.
Final Thoughts
So, as explained in detail above, the process of setting a voice recording as a ringtone on your iPhone is very straight forward. You can follow any of the process you prefer.
Now you can record the voice of you loved ones and set it as the ringtone of your iPhone. We really hope this guide is useful to you and helps you set your own custom ringtone on your iPhone. If you have any doubts or suggestions, let us know in the comments below.

