How to Install a Language Pack in Windows 11/10 as Display Language
It is now more and more common for people to use multiple languages for work and life, and Microsoft also allows users to switch display languages on Windows 11 or Windows 10 computers. This article will guide you through Windows 11 and Windows 10 language pack downloading and installation process step by step. In case you are facing problems, like language pack not downloading or your Windows 11/10 is single language edition, we also provide useful solutions and suggestions. Keep reading and install language packs for the latest version of Windows 11/10.
Part 1. Microsoft Windows Language Pack Types
Some Windows users may find that some parts of their operating system interface do not display in desired language after installing language pack. That’s because Microsoft provides 3 types of language pack:
- Fully localized language pack: It contains 100 percent of the resources for a language and locale.
- Partially localized language pack: It contains 100 percent of the resources for a language and locale, but not all of the resources are localized in the language pack
- Language Interface Pack (LIP): A partially localized language pack that includes less than 100 percent of the localized resources. LIPs can be installed only on top of a fully localized language pack.
For end users, what we can do is installing language interface pack, which is partially localized for some languages. This explains why you might install a Portuguese language pack, but still get some parts display in English after a reboot. Check the supported language packs and language interface pack (LIP).
Note: Make sure to save your work and close the running programs before applying the steps below, because your computer may be restarted forcefully or by yourself. In case you lose important work, like interrupted file transfer or unsaved document, don’t hesitate to recover unsaved or lost Word document as soon as possible. You can also use Jihosoft File Recovery Software to recover deleted or formatted photos, videos and more files from SD card, USB drive, hard drive and all other storage devices.
Part 2. Install Windows 10 Language Pack Using Windows Update
For Home and Pro edition users, the easiest method for installing Windows 10 language pack is using Windows Update. Depending on the Windows 10 version of your computer, the specific operation may slightly vary. Here is an instruction for Windows 10 Pro, 1703 build.
- Step 1. Go to Settings > Time & Language > Region & language.
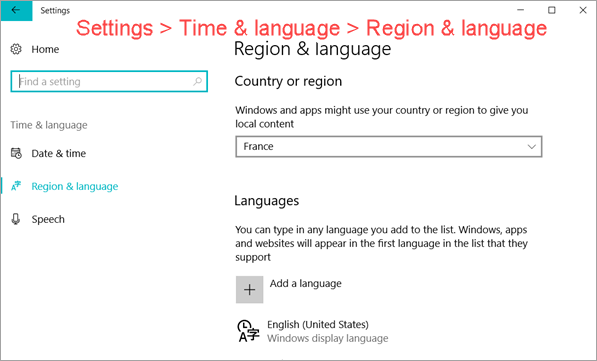
- Step 2. Select a region, then click Add a language.
- Step 3. Choose the language you need. You may also need to choose specific region if it is English, French, etc.
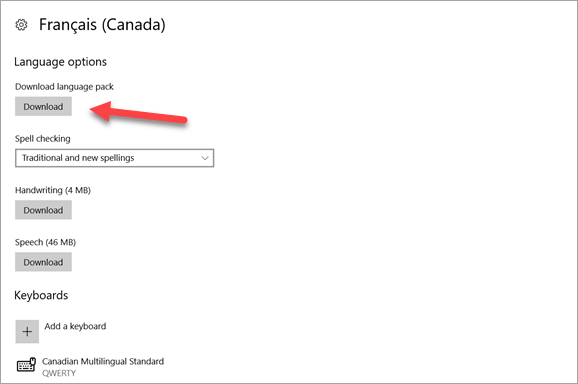
- Step 4. Click the language pack you just added, then click Options > Download language pack. Here you can also download Handwriting and Speech pack.
- Step 5. Go back to the previous screen when the download is complete, and then click Set as default.
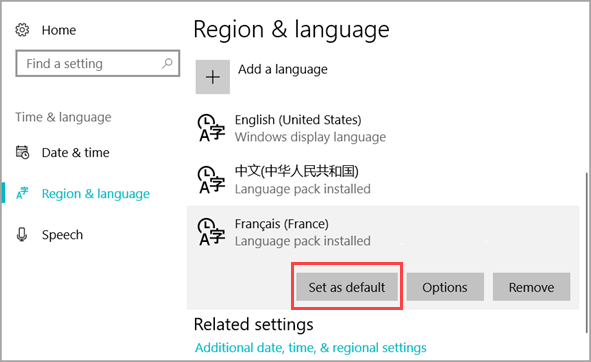
If everything goes well, the display language should be changed after a reboot.
Alternatively, since Windows 10 still keeps Control Panel, you can also go to Control Panel > Clock, Language and Region > Language, then choose Add a language, and set it as the primary language.
Part 3. How to Fix Windows 10 Language Pack Not Downloading
On some occasions, the language pack may refuse to be downloaded or installed. Here are some of the symptoms:
- The download process aborts accidentally without any error code
- Download failed
- Failed to install
- A language pack isn’t available
- The language can’t be installed on this computer
Please try a small trick to fix the problem:
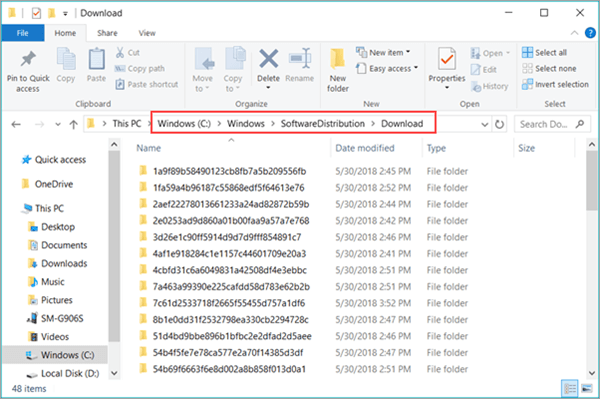
- Step 1. Open Windows Explorer, go to C:\Windows\SoftwareDistribution\Download.
- Step 2. Delete all files and sub-folders within the Download folder.
- Step 3. Go back to the language pack page and try downloading again.
Now the language pack should be downloading, and you can set it as default display language as described above.
Part 4. Manually Download and Install Windows 10 Language Pack
You can also download language pack files (aka. CAB files) and install them manually. Since Microsoft doesn’t provide official direct download links for end users, you may need to search for language pack files on search engine, which is actually also very convenient. Just make sure the language pack suits for your Windows 10 build.
Where to Download Language Pack for Windows 10 Build 1809?
There is no direct link from Microsoft for end users to download the language packs. Besides, the language packs should be installed on the right build of Windows 10. Therefore, if you failed to download language packs through Windows updates, then you need to search for the desired language files online. Some forums and communities may post the latest cab files.
Follow these steps to manually install Windows 10 language pack:
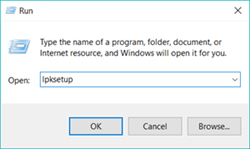
- Step 1. Press Windows key + R, type lpksetup and press Enter.
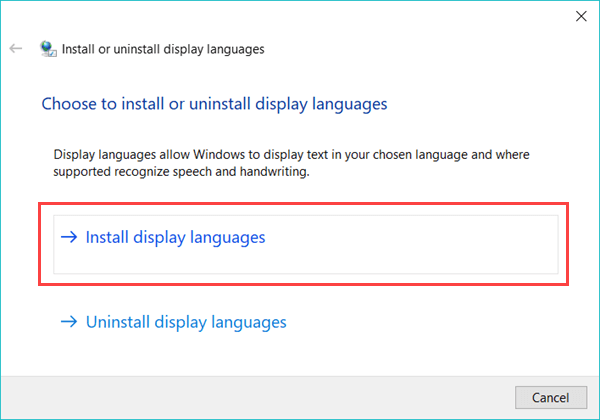
- Step 2. Click Install display language.
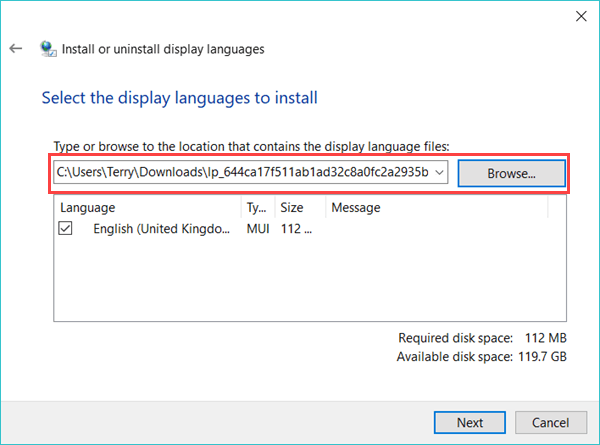
- Step 3. Browse the location of downloaded CAB file, then click Next.
- Step 4. Accept the license terms, then click Next.
- Step 5. Installation will start automatically.
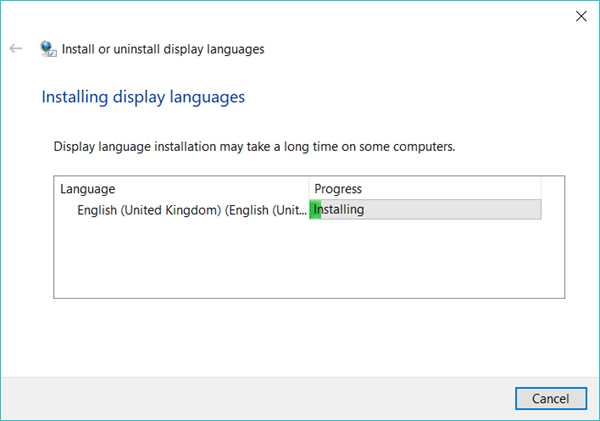
- Step 6. Click Close when the language pack installation is completed. Reboot may be required.
If the installed language is not set as default, you can do it manually on Settings > Time & Language > Region & language. However, the display language of the Office program may not be changed accordingly. You need to download language pack for Office.
Part 5. Windows 10 Single Language Change Language
Windows 10 single language is basically Windows home version, but with only one system language. It is usually pre-installed in some Windows laptops, and the users cannot add or change UI display language as Pro version users do. The best solution for Single Language Windows 10 is to upgrade to Pro version.
Part 6. How to Add Language Packs in Windows 11
Similar to the process in Windows 10, it is also easy to add and install a language pack in Windows 11. Here are the steps:
- Step 1. Click Start button and go to Settings > Time & language > Language & region.
- Step 2. Under Language, select Preferred languages and then click Add a language.
- Step 3. Choose a language from the list, and then click Next.
- Step 4. Select optional features (language pack, text-to-speech, handwriting) and click Install.
- Step 5. Wait a while and then you will see the added language from the drop-down list next to Windows display language.
The instruction above will help you make your Windows 11 computer more locally. However, it is possible that some users will encounter similar troubles as mentioned above which happen to Windows 10. Don’t hesitate to leave a comment with a detailed description of your problem and we will get it covered.

