Photoshop Skin Retouching: How to Smooth Skin in Photoshop
Every professional photographer, be it wedding photographer or photojournalist, has the need to edit the digital photos they take, because not every photo that a photographer takes will be perfect. There will be some pictures with the common mistakes in photography, like the red-eye phenomenon, poor exposure, finger over the lens syndrome and the hand shake syndrome. And sometimes, imperfections may appear on the face of the model.
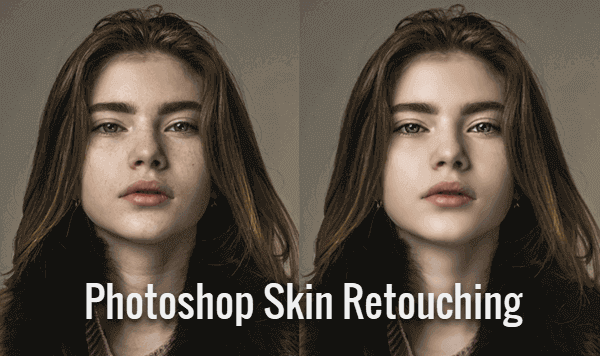
Thankfully, the best benefit of being in this era is – everything is possible. Yes, everything, there was a time when one can only think of black and white pictures and they are uneditable. Today, that’s not the case, you can have any picture from black and white to color, and you can even get soft skin on your face naturally in the photo. There are many Photo Eraser techniques that can be used to fix facial imperfections and one of these powerful techniques is – Adobe Photoshop.
With Photoshop skin retouching even the ugliest looking pimple can be removed and make the model’s face look perfect. Believe it or not, Photoshop is a very easy to use tool. If you are also pondering how to smooth skin in Photoshop, then this post is ready for you. Here in this post we will walk you through the process of how to retouch face in Photoshop with detailed steps.
Let’s get started.
PART 1. How to Retouch Face in Photoshop
Here are the rudiment steps on how to smooth skin in Photoshop and make the photo look more professional.
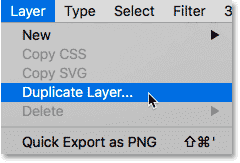
- Step 1: First, open your photo in Photoshop and to protect your original photo, you have to make a copy of it. To do that, go to Layer > Duplicate Layer, and then name this layer as you like and click OK.
- Step 2: Now choose the Spot Healing Brush from the left toolbar. Then set the “Type” option of the Brush to “Content-Aware“.

- Step 3: Now, click on the skin blemishes that you want to remove from the person in the photo. It will immediately fix the blemished skin texture with surrounding good skin texture. Please make sure to set the size of the brush a little bit larger than the blemish so as to have the best result.
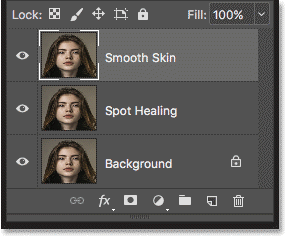
- Step 4: After removing the facial blemishes, the subject of the photo will have better skin in Photoshop. Now you are all set to smooth and soften the skin texture. So, make a copy of the second layer and the following edits will be made on this new layer.
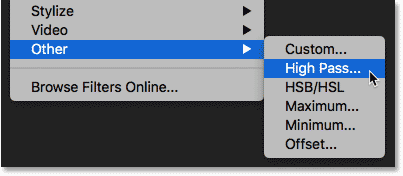
- Step 5: Now go to the Filter menu > Other > select High Pass filter. Set the Radius value between 20 and 26 depending on the size and resolution of the image. For most of the portrait photographs, it works the best if you set the value at 24.
- Step 6: Next, you will need to use the Gaussian Blur to blur the High Pass filter effect so as to make the effect softer and less detailed. In this way, you can bring out more good texture in the skin of the subject in the portrait. For that you need to go to Filter menu > Blur > select Gaussian Blur. Set the Radius value between 2 and 4 and click OK.
- Step 7: Now go to the Layers panel and change the layer blend mode to Linear Light, which will create a high contrast and over-sharpened effect in the image.
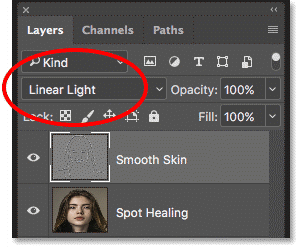
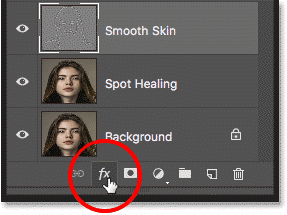
- Step 8: After that, head to Image menu > Adjustments > select Invert. When you are done, you will find that your image is filled with ugly halos. Now you need to reduce the halo by clicking the Layer Styles icon and then selecting the Blending Options.
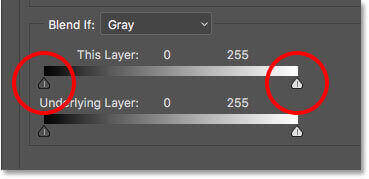
- Step 9: Then the Layer Style dialog box should appear. You will find that there is a bar labeled “This Layer” which has two sliders. The left one can be used to blend the darker areas of the layer while the right one controls the lighter areas. Then you can reduce the lighter halos and the darker halos by pressing and holding the Alt(Win)/ Option(Mac) key and at the same time, dragging the sliders from left to the right or from right to the left to reduce the halos until you get the satisfied result.
- Step 10: Now press and hold the Alt(Win)/ Option(Mac) key in your keyboard and click on the Add Layer Mask icon in the Layers panel in order to apply the smoothing effect only on the skin area. Then pick the Brush Tool (B) from the toolbar and set its color to white as your Foreground color. You can pick any brush size; however, set the brush on Normal mode, Hardness to 45%, the Opacity to 100% and the Flow to 100%. Now paint over the skin wherever you want to smooth.

- Step 11: And you are almost done! If you find that the effect is too intense, you can lower the Opacity of the uppermost layer to reduce the effect.
Just in 11 steps you would be able to have a wonderful picture that you can flaunt across all social media handles.
PART 2. How to Get Soft Skin On Your Face Without Photoshop
If Photoshop is not your cup of tea, and if you want to know how to get soft skin on your face naturally, then you can use the following tricks before pressing the shutter:
- Get your makeup right. Yes, it is very important that your makeup is perfect. For instance, if you are going to click a picture in day time, having heavy makeup will simply ruin your picture. So, it is advised that you get the right makeup, over doing anything will simply affect your picture negatively.
- The light matters. Believe it or not, light in which you are set to click your picture will also impact your image. You cannot click your picture in any light and expect to have a great picture. And please note that dirty light may ruin skin texture in your photo. Therefore, it is important that you click your picture in the right lights and right light directions. You can make use of reflector, light box, light catching backdrop and even mirror to get natural light.
- Maintain proper distance. If you want to avoid your facial imperfections or blemishes or pimples naturally, then the best is to avoid close-ups. Yes, to avoid the facial blemishes naturally in the picture the best is to distance the subject.

Try out these methods, you will surely love your picture!!

