How to Increase Resolution of Photo With and Without Photoshop
Some people think that just adding pixels to an image is increasing resolution. To some extent, it may be true but if it doesn’t end up improving the quality of the image alongside, just the addition of pixels is not enough. Although it is very difficult to convert a low-res picture into some good quality stuff, yet it is not impossible if the post-processing is done in the right way.
Before digging deeper into the process of increasing photo resolution, let us first have a basic understanding of what exactly the meaning of resolution is. That’s because you will be able to figure out the need for enhancing the resolution in your photos only if you have a basic understanding of it.

What is the Basic Meaning of Resolution?
As far as the basic meaning of resolution is concerned, you can simply say that it is actually the measurement of the number of pixels in width and height dimensions of the image. And, the total number of pixels in the image can be calculated by multiplying the number of pixels in width by the number of pixels in height.
Just for an example, suppose a camera offers an image of resolution of 8050 x 6190, it means that the number of pixels in width is 8050 and on the other hand, the number of pixels in height is 6190. And, if we multiply both the values, we will get a total of 49829500 as the total amount of pixels.

It simply means that a photo with a higher number of pixels will have a higher resolution, right? More the number of pixels, more the detail you will have in the picture. And, when there is more detail in the picture, you can easily print the large prints of the picture with a good color transition. If you want to make your photo much more perfect, we recommend you try this Photo Eraser software to remove unwanted objects in the photo to make people focus on the subject of your photo.
PART 1. How to Increase Resolution of Image With Photoshop
No matter how advanced post-processing software you are using, when it comes to enhancing an image to the CSI-level, it is not so easy in regular practice. We have seen many cases of getting an image having gone out of focus after increasing its resolution. So just adding pixels is not so difficult for any post-production software. The thing which is actually difficult is to get something highly meaningful in terms of detailing. So here comes the role of “Upsampling”. It is actually the process of increasing the resolution or the pixel count of an image.
When it comes to upsampling an image in Photoshop, you can follow the simple and easy steps mentioned below:
Step 1: Open photo
First, launch Photoshop on your computer and open the photographer you are intending to upsample.
Step 2: Select “Image Size”
Once you have opened the image in Photoshop, go to the “Image” menu and click to open it. After the “Image” menu has opened in front of you, select the “Image Size” from the menu. Thus the dialogue box for image size will open up.

Step 3: Enter pixels dimensions
Once the dialogue box of image size has opened in front of you, all you need is to do two things. First thing is to enter the pixels dimension and the second thing is to select the desired method of upsampling.
Step 4: Sharpen image
Once you have successfully performed the steps mentioned above, you may slightly sharpen the image if you think it is required. Otherwise, it is perfect. And, it is done!
Thus you can easily increase the resolution of a photo in Photoshop by following the steps mentioned above and upsample it for printing.
PART 2. How to Increase Resolution of Image Without Photoshop
Although most of the photographers today have access to Photoshop for post-processing their photographs, yet we have seen many of them asking questions like “how to increase resolution of image without Photoshop”. So, is it actually possible? Of course, it is. There are some dedicated upsampling software packages that are mainly meant for being used for increasing the resolution of images.
Option 1: Increase Photo Resolution With Fotophire Maximizer
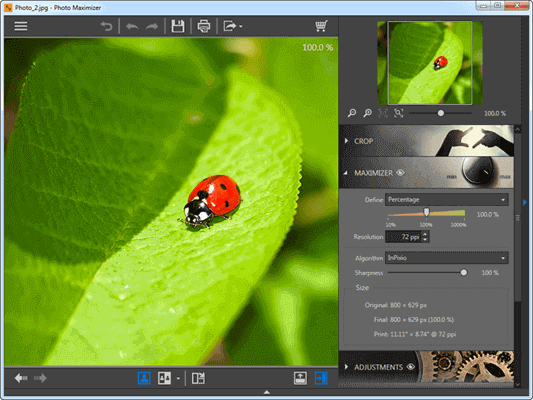
When it comes to the best-dedicated software for performing the task of upsampling, we can confidently advocate for the Fotophire Maximizer. Wondershare Fotophire Maximizer is a photo editing tool that can be used to perform various types of editing operations on an image. In order to enhance your photos, apart from increasing the resolution, you can also add various types of background, photo frames, filters, etc. with the help of this awesome tool.
Key Features
This tool comes with the following key features:
- The images can be enlarged to the print size with the use of this tool.
- It is possible to create low-light images with just a single click.
- There are over 200 effects that you can use so as to add a personalized effect to the pictures.
- This tool can help you to zoom your images up to 1000% without causing any type of blur or pixelation.
- You can also remove the background of your photos very easily with the use of this program.
- You can also take close-ups of any details of your photo with high res.
- Image-maximization is possible without impacting their quality.
- Moreover, this tool can also help you easily remove unwanted elements or objects (like date stamp, watermark, etc) from your photos.
Process To Increase Image Resolution
You can follow the steps mentioned below in order to increase the resolution of your photos with the help of Wondershare Fotophire Maximizer:
- Step 1. First, it is required to download & install Fotophire on your PC or laptop.
- Step 2. Once you are on the homepage of the program, select the “Fotophire Maximizer” provided at the bottom part.
- Step 3. The next step is to import the picture that needs to be enlarged. And, it can be done by clicking on the “Open” button & selecting the required picture from your computer.
- Step 4. Now you will need to click on the icon of the inverted triangle so as to be able to select the parameter that you are willing to set for your picture.
- Step 5. Then you have to drag the slider for increasing the value of the selected parameters. Thus you can easily adjust various types of parameters like width, length, height. And, this will eventually change the image resolution accordingly. Otherwise, you can also increase the resolution directly.
- Step 6. Once you are happy with the changes you have made, the last step in the process is to hit the “Save” button in order to finally save the changes. And, it’s done!

Option 2: Increase Photo Resolution with ON1 Resize
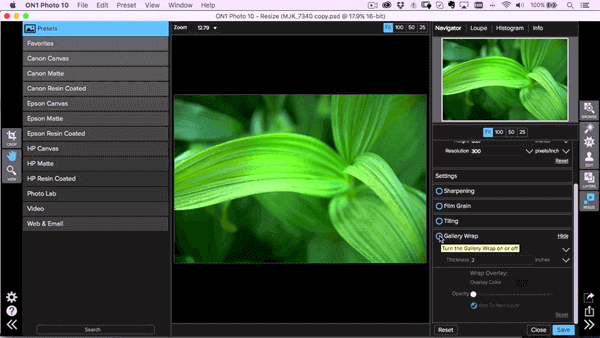
Another option to increase the resolution of a picture without Photoshop is this “ON1 Resize” which is known as “Genuine Fractals” in beginning and later its name changed to “Perfect Resize”. And, now it is known as “ON1 Resize”.
In order to get highest quality enlargements and prints, ON1 Resize is a must-have tool available for Windows and Mac computers. It is one of the tools to view, edit and organize pictures. The new version of this software even makes it much more easier and faster to resize images without losing quality.

If you already have Photoshop, we wouldn’t recommend you to buy ON1. Rather you can go for such a dedicated standalone program for enhancing the resolution of your photos if you don’t have access to Photoshop.
Option 3: Increase Photo Resolution Free with GIMP
In case you are looking for a free program to convert low resolution image to high resolution, there are also available some such options out there. One such program that you can choose for performing this task is GIMP. Apart from being used for increasing the resolution of photos, this free tool can also be used for performing the task of border photography.
And, as far as the process of upsampling in GIMP is concerned, the process is very simple and easy just like Photoshop. All you need to do is just follow the steps mentioned below:
Step 1: Open photograph
First, launch GIMP on your computer or laptop and open the image or photograph that you intend to edit in it.
Step 2: Scale image
Once the photo to be edited is opened in GIMP, the next step is to go the menu bar and open the “Image” menu from there. Now, from the “Image” menu, select the “Scale Image” . It will open up the “Scale Image” dialogue box.
Step 3: Complete upsampling
Once you have the dialogue box of “Scale Image” opened in front of you, all you need to do next is to choose the desired options of upsampling and sharpen the photo. And, it’s finally done!

PART 3. How to Increase Resolution of Photos on Mobile
There are so many mobile apps also available out there that you can make use of in order to enhance the quality or resolution of your images. One of the best apps for performing such tasks is “Photo Resizer”. And, when it comes to entering the desired value for the size of the photo, you can enter it in terms of pixels, inches, millimeters, and centimeters as well.

All you will need to do to increase the resolution of your photos with the help of this mobile app is just follow the simple and easy steps mentioned below:
Step 1: Import photo
First, open the “Photo Resizer” app on your mobile after installing it successfully. And, then import the photo or photos that you want to edit. And, an option for taking a new photo is also available in the app. So you can also take a new photo instantly within the app.
Step 2: Enter the image size
The next step is to select the desired output value for the size or dimensions of the photo that you have imported. If you don’t want to select any of the predetermined dimensions offered to you, you can also enter a custom dimension of your choice. And, further, you are also offered the facility to crop your image in order to get the required size. You can do so with the Multitude Gestures.
Step 3: Save the modified image
Once you have successfully modified the image size or dimensions as per your requirement, you can go ahead to save it. Just tap on the “Save” option. Moreover, the options like send, print, share, etc are also available that you can make use of as per your requirements.
PART 4. How to Increase Resolution of Image Online
When it comes to tools to increase resolution of image online, many such websites are available out there for you to make use of. For instance, Fotojet is one of such available options that you can use to convert low resolution image to high resolution online. Not only the tools to increase resolution of image online but many other types of editing tools used for customizing your image are also offered by it.
And, the steps to be followed in order to increase resolution of image online with the help of this image quality increaser online are as follows:
Step 1: Open the image to be edited
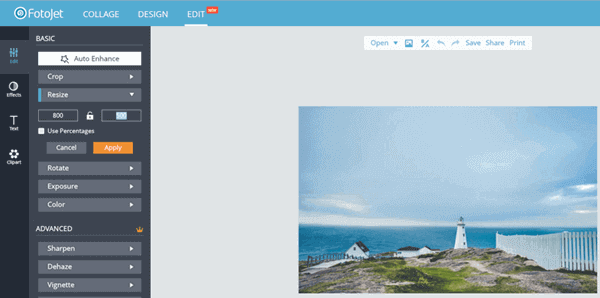
The first step is to open www.fotojet.com in your browser and import the image that you want to edit in its editor. The image can be imported either from your PC or from your profile on social media.
Step 2: Enter the image dimensions
Go to the menu bar and choose the “Edit” menu from there. Once it is selected, hit the “Resize” button. You can easily find the “Resize” button under the basic section. Now enter the image dimensions in order to increase its resolution. And, in case, you are interested in increasing the dimensions or resolutions in percentage, it is also possible. And, you can make it happen by checking the box & entering the percentage value.
Step-3: Apply new resolution
Once you have successfully entered the new value for the dimensions of the image by following the steps mentioned above, just hit the “Apply” button in order to apply the newly entered values. And, it’s done!

Final Words
We hope this article helped you a lot to clear all of your doubts regarding the methods of increasing the resolution of photos with and without Photoshop. And you can choose the best one to increase image resolution online or on mobile device according to your needs.

